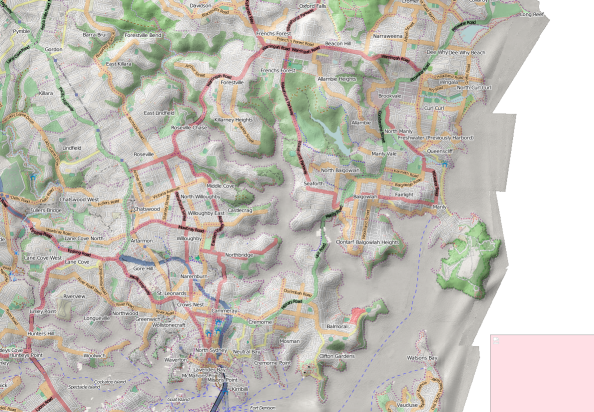
A Mashup of Nearmap Shaded Relief Terrain Maps with OpenStreetMap Mapnik Tiles
Some eye candy from my experiments of combining Nearmap terrain tiles with OpenStreetMap tiles. These images (which are hyperlinked to full sized ones) are derived works from OpenStreetMap.org default mapnik tiles (which is based on data from OpenStreetMap contributors licensed CC BY-SA 2.0), and Nearmap.com shaded relief terrain maps licensed under the Nearmap Community License.

Nearmap Terrain Maps with OpenStreetMap Mapnik Map. Based on images (c) OpenStreetMap contributors, CC-BY-SA, and (c) Nearmap, Nearmap Community License.

Nearmap Terrain Maps with OpenStreetMap Mapnik Map. Based on images (c) OpenStreetMap contributors, CC-BY-SA, and (c) Nearmap, Nearmap Community License.

Nearmap Terrain Maps with OpenStreetMap Mapnik Map. Based on images (c) OpenStreetMap contributors, CC-BY-SA, and (c) Nearmap, Nearmap Community License.

Nearmap Terrain Maps with OpenStreetMap Mapnik Map. Based on images (c) OpenStreetMap contributors, CC-BY-SA, and (c) Nearmap, Nearmap Community License.

Nearmap Terrain Maps with OpenStreetMap Mapnik Map. Based on images (c) OpenStreetMap contributors, CC-BY-SA, and (c) Nearmap, Nearmap Community License.
My approach is based on http://wiki.openstreetmap.org/wiki/TopOSM/Details. I used two mapnik stylesheets, one for everything minus the labels, and one with just the labels. From here I used this bash script,
for f in nearmap-dem/*/*/*
do
f=`echo $f|sed 's/[^\/]*\///'` #get rid of the nearmap-dem part
d=`dirname $f`
mkdir -p "grayshaded/$d"
#convert "nearmap-dem/$f" -colorspace gray "grayshaded/$f" #just convert to gray
#...alternatively, extract the Lightness channel...
convert "nearmap-dem/$f" -separate -channel Lightness -colorspace gray "grayshaded/$f"
lastdir=`dirname "grayshaded/$f"`
lastfile=`basename "grayshaded/$f" .png`
rm -f "$lastdir/$lastfile-0.png" "$lastdir/$lastfile-2.png"
mv "$lastdir/$lastfile-1.png" "$lastdir/$lastfile.png"
done
to convert a directory of Nearmap Terrain tiles into something suitable to be passed in as the hillshade layer to the combine script at http://wiki.openstreetmap.org/wiki/TopOSM/Details#Combining_images_into_a_final_composite, and then I used combine script to merge the layers together for each tile.
Update: The Mapnik stylesheets I used for labels and nolabels are at http://gist.github.com/653184

The hillshade looks great but the map is not very readable
Do you mean the full size ones (you can click them, they link to full size versions) are not very readable, or just the scaled down ones?
They look ok but the streets are harder to see due to the transparency i guess, especially the green ones.
Hi Andrew,
have you maybe also experimented with the approach described in
http://wiki.openstreetmap.org/wiki/Hillshading_using_the_Alpha_Channel_of_an_Image
that I use on http://hikebikemap.de/? You can also switch to “regular” Mapnik there.
I don’t have hillshading tiles for Australia at the moment though, sorry.
Cheers
Colin
I haven’t tried that. Something to look into in the future I guess.
Hopefully map viewers (like Marble, libchamplain, etc..) will eventually be able to show multiple tiled map layers on the one map. Then this approach along with transparent streetmaps overlaid on aerial maps would become more accessible to users.
Marble can actually do this now, since version 0.10.1 (which is in KDE 4.5.1): http://nienhueser.de/blog/?p=156
I’m also missing this on mobile apps, indeed.
Or you can just go to http://www.nearmap.com and enable the StreetMap layer over the Terrain layer. For example: http://www.nearmap.com/?ll=-32.123726,116.072187&z=14&t=ph
Of course, your approach lets you control the StreetMap rendering 🙂
Ben
Yep, and that’s great for the normal user.
Yes, I wanted to see all map features from the Manik map and terrain together though, particually areas like forest, parks, and the various landuses.